
I’ve had a few people asking me how I constructed Belle’s blue provincial dress, so I thought I’d make a post on it. It’s not that difficult, actually.

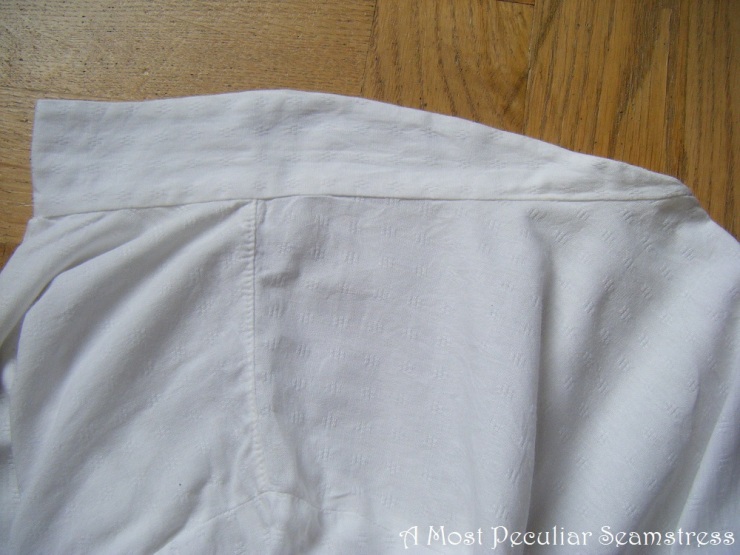
First the blouse: any pattern could do as a base. Make the sleeves a little shorter than to the wrists, and cuff them. As you can see I haven’t even hemmed the bottom edge yet, but since it won’t show…

The most important thing on the blouse is the characteristic collar, which should be folded down in back, and taper into nothing at centre front. This is how it looks, with the centre back folded. It’s sewn in two layers. There’re probably better ways to do the collar, but I was short on time when I made it. Next time I make this costume I’ll experiment a little more with it.


Make sure not to do the neck and arm openings to big at first – just make them big enough to go over your head and to put your arms through, and then draw them on the fabric while wearing it. Don’t make the bodice too long, or it will wrinkle and look untidy. When you are satisfied with the fit you can use this mock up as the lining for the bodice, or save it as a pattern for later use.
I put self fabric piping in all the bodice seams, because it gives a nice finishing touch, and also makes the seams stronger – they also give a slight supporting effect, and prevent some wrinkling.
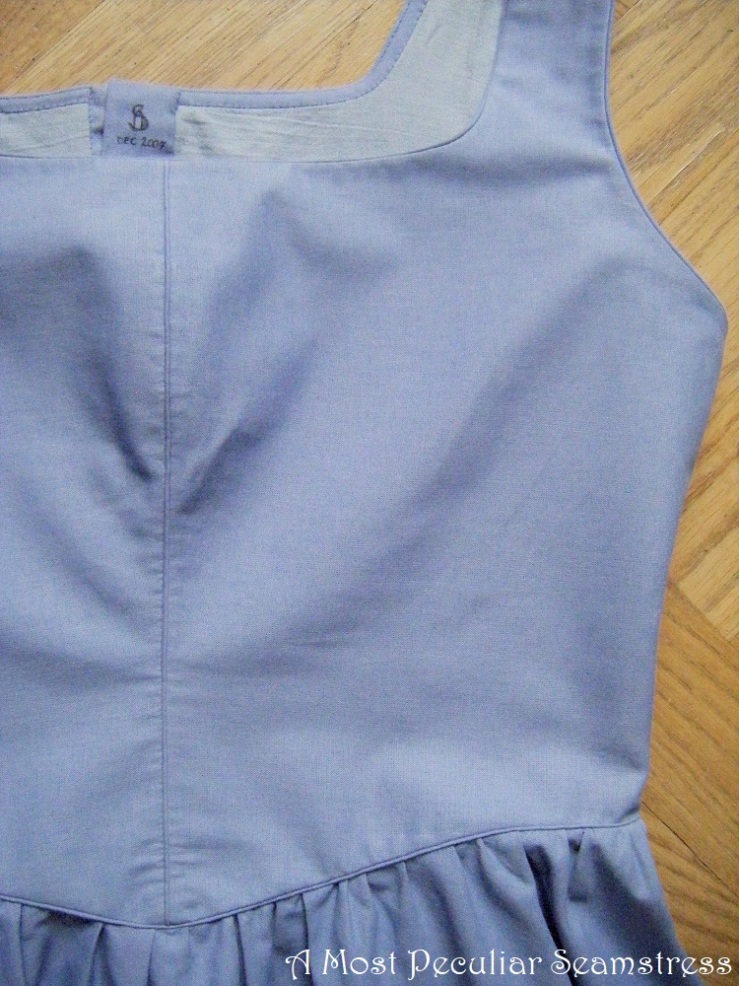

The skirt is made as any half circle skirt, lightly gathered and reaching to lower calf – simple as could be. Since the bodice is slightly pointed in front, I had to cut away a corresponding amount of fabric at the centre front of the waist of the skirt.
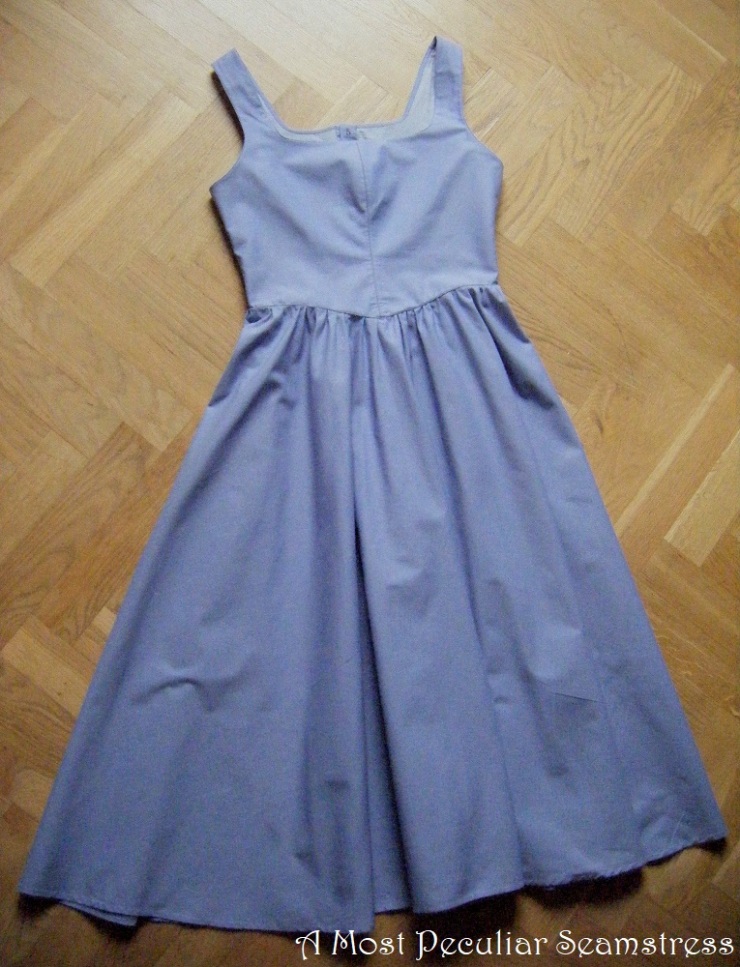
That’s it, a rough guide on how to make this costume. The apron is simple, a rectangle (straight, gathered or pleated) sewn to a waistband. And don’t forget to wear at least one petticoat. If not, the skirt will look skimpy, and will cling to your legs, which isn’t the right look for this dress. Oh, and a note on fabric choise: avoid anything shiny, polyesterish! It will look cheap and amateur-ish. If you’re on a budget (like I was), better use a low price, plain cotton, as that will look so much better.
Hope this helped, and good luck!

I really like this dress! A very nice colour choice, I must say that it suits you!
LikeLike
This is so cute! I was just watching B&B last night! Great reproduction!
LikeLike
Thanks for posting this ! I've been wanting to get a closer look at it for quite some time. Beautiful dress and lovely blog !
Hannah (from the sewing academy)
LikeLike
Thank you so much!
LikeLike
Oh, wow, Sarah! You do beautiful work! And you look so lovely in it, too. 🙂
By the way, I am really enjoying your blog!
Hugs,
Rachel
LikeLike
Thank you so much for this detailed look at Belle's dress. I have loved this costume of yours since you posted about a while ago, when I first started reading your blog. The dress portion looks especially lovely. I think an outfit like this could be very nice even as modern wear; a nice alternative to the sometimes dowdy jumper and blouse combo. This is very pretty. Thank you so much for explaining how you made it!
LikeLike
vilken fin blus och klänning. din blogg är fantastisk!
LikeLike
Wow I really need that but do you know where I can get that kind of cloth and how can you make the apron
LikeLike
Thank you all who commented!
Anonymous: I take it that your question regarding cloth refers to “low price, plain cotton”. The fabric I used was the same kind as is used in sheets, so it really is the most simple you could find. Any fabric store should have it (if they have it in the right colour or not is another issue).
The apron is so simple to do, but since it'd take me to long to explain it now, and it would be silly to reinvent the wheel, I suggest you look at this description by Elisabeth Stewart Clark: http://www.thesewingacademy.com/wp-content/uploads/2010/10/2010-Basic-Apron.pdf
Good luck!
LikeLike
Thank you so much for posting this!! My question is regards to the petticoat. Did you buy it or make and and what type of material did you use for the petticoat and how did you make it? Again thank you very much 🙂
LikeLike
Actually, I have so many different petticoats lying around (both for modern and period wear), that I pretty much took a couple of the ones that worked best… Since the skirt of the dress is much slimmer at the waist than the hem, the petticoats should be as well. This can be done by making them half circle, same as the dress skirt, or by making them tiered – I believe that's how mine were made. Most of the petticoats I use for “modern” wear (which is what I wore with this outfit) are made from different weight cottons or cotton blends. Some of them are made from old curtains, which already have pretty flounces or similar 🙂
LikeLike
Would you be interested in getting paid to make one of these for a teenage girl size 6-7? I am willing to pay well.
LikeLike
The problem with making a dress that's supposed to fit snugly is that it is nearly impossible to make it fit well unless you can fit it directly on the person… It most likely won't look very well. That aside, I'm expecting my first child in less than two months and is quite tired at the moment and hardly have energy for the sewing I *must* do. Still, thank you for considering me 🙂
LikeLike
Thank you SO much for posting this. I've been trying to find a pattern that is really close to the one in the film. And this is perfect! While I don't sew, my friend does and she said she'll make it for me. Thank you so much from one Belle to another! 🙂
LikeLike
Hello! I've loved your version of this dress for quite a long time (it's the most realistic looking one out there!) and I am finally getting around to making one for myself! I know this was posted quite a while back, but I was wondering if you have any tips on fitting the bodice without any darts/princess seams? I've never made a bodice with just a center seam and can't seem to find any advice or tutorials on fitting one! (or what rough shape the pattern is) I have a general idea of how to do it, but I thought if you had any tips I'd be glad of some advice before I dive in!
Thanks so much!
~Hadley
LikeLike
Hello Hadley! Thank you very much!
I do indeed have a link that might help. It's for fitting tight, late medieval dresses, but the principle for the bodice is the same: http://cottesimple.com/tutorials/curved-front-seam/
LikeLike
Thank you so much, Sarah! That's just what I needed!
LikeLike
Glad I could help 🙂
LikeLike
Hi Sarah! I've really enjoyed your blog for a while. I stumbled upon it because of this costume and I decided to make my own. So far, the dress part is going really well. I never thought I'd be able to construct a dress like this, but somehow it worked out! However, I completely bombed making the shirt. My shirt was way too small, some weird stuff happened with the sleeves, and I just have no idea how to make it better. Do you have any pattern suggestions that might help? Everything I've found just doesn't look half as right as yours does. I would appreciate any help you can give! Thank you!
LikeLike
merci beaucoup pour ce tuto,c'est vraiment magnifique! j'ai envie d'acheter un costume de Belle : http://cosplaysky.fr/promotion/costume-noel.html , mais maintenant je peux le faire moi-même.
LikeLike
Hi Sarah! This is so helpful, thankyou for all the time you put into it. I'm a little confused about the piping in the bodice seams – you said that you'd already basted the fabric and lining together, and were sewing them as one piece of fabric. How did you then get such a neat result on the inside of the neckline and armholes if you didn't sandwich the piping between the fabric and the lining? I hope this question makes sense!
LikeLike
i know this was posted a super long time ago, but have you considerd selling this? or making dresses like this? its so pretty and im so bad at making dresses, im going to disney world in a couple of months and ive already spent hours resereaching the perfect dress but theres none out there!
LikeLike
I folded the raw edges of the piping under and stitched them down by hand – simple as that 🙂
LikeLike
I have considered it, but it would be local, as shipping abroad would be way too expensive. You can't hire a seamstress?
LikeLike
Hi, absolutely love your work!
I was just wondering, is the piping on the front, side, and back seams visible like it is around the edges?
It's a bit hard to see in the photos and I was just wondering if the piping was actually sewn on the inside of the dress (kind of like boning).
Thanks 🙂
LikeLike